|
|
Sample - Structure Modification > Dr. Probe / Documentation / GUI / Sample / Slices |

|
Layout of the structure modification dialog
The Structure Modification dialog as shown by the screenshot below can be used to view and modify the structure model currently loaded by the slice creation dialog. The main purposes of this dialog are the orthognalization of non-orthogonal input structures, the re-orientation of the input structure to a specific projection axis and the setup of the physical x-y-frame used by the multislice calculation. The functions provided by this dialog are mainly targeting at the modification of periodic crystal structures without defects. In particular the re-orientation and re-sizing algorithms may not produce reasonable results when the input structure contains defects, interfaces, nano-particles, or amorphous material. Such structures should be modified with other, more specialized crystallography software.

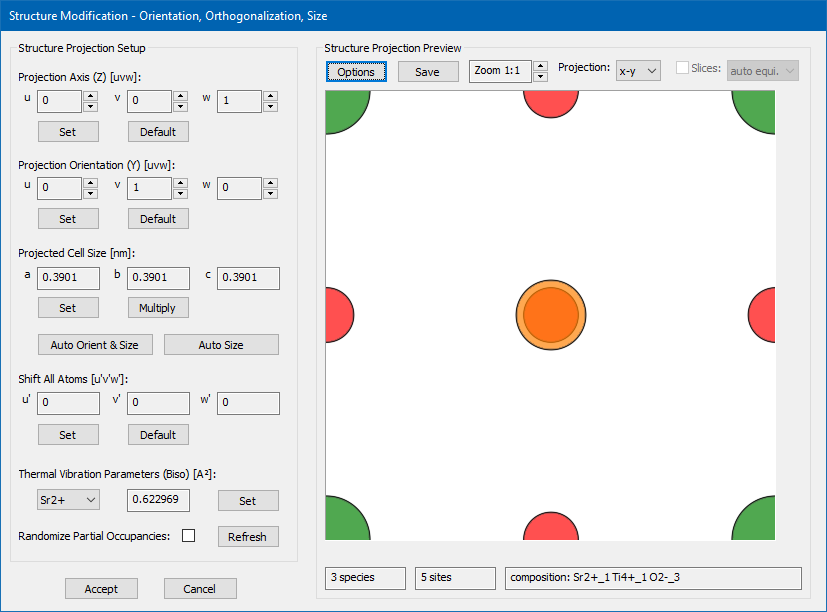
The documentation of the dialog and the implemented functions presented here is done by means of an example, which is a cubic perovskite SrTiO3 as published by Yu.A. Abramov et al. [Acta Crystallographica B51 (1995) 942-951]. The input structure model is provided here by download in form of a CIF file. You can load this CIF file in the slice creation dialog and then open the structure modification dialog by pressing the [View & Modify] button. Doing so, you should receive a similar display of the structure modification dialog as shown in the image above. When opened, a proposal of an orthogonalized version of the input structure is generated for a projection along [001] with minimum size of the super-cell. In the present example, this proposal is identical to the input structure spanning a cubic cell with 3.9 Å lattice constant. The initial display shows the modified structure projection in the x-y-plane. Here, the display options have been setup to show Sr in green, Ti in orange, and O in red color.
The dialog is divided into a left part providing controls and functions to modify structure parameters, and a right part displaying a projection of the modified structure. The modifications are applied to a copy of the structure model currently loaded by the slice creation dialog. When closing the dialog with the [Accept] button the modified copy will replace the previously loaded structure model. Closing with [Cancel] will discard all changes and keep the previous structure model for slice creation.
Structure projection display
The structure display on the right side of the dialog shows a projection of the current modified structure model. A tool tip provides information about the atomic composition below the mouse pointer when moving with the mouse over the display area.
The display window spans the available space in the dialog at 1:1 zoom setting. The zoom setting can be changed in by means of the spin control attached to the edit box denoting the current zoom factor. For zoom factors > 1, the size of the window becomes larger than the available space in the dialog. In this case scroll bars are added to navigate the view port. The structure display always spans over the complete projected super-cell in the chosen projection plane. The two info fields below the image denote the number of atomic species and the number of atomic sites occupied by these species in the modified super-cell.
The projection plane of the structure display can be selected by the drop-down list control in the upper right corner of the display area. Three projections are available. Choosing x-y projects the structure along the c-axis of the modified orthogonal super-cell, which is identical to the chosen projection direction of the image simulation, i.e. the main incident beam direction. The other two projections, x-z and y-z, can be used to look at the structure from the side and see the number of atomic planes along the main incident beam direction. this may provide a hint on how many slices should be used for the creation of phase gratings from the structure. To help with this, lines can be overlayed in these projections with the Slices-controls on the top right of the dialog.
The graphical properties of the display, such as background color, colors used for the atomic species, transparency, and borders can be adjusted by an additional options dialog that opens and closes by clicking on the [Options] button in the top-left part of the display area.
The [Save] button provides an interface to store the modified structure model as CIF file or CEL file, or to save the current image in several different graphics file formats, such as JPEG, PNG, or TIF.
Structure modification functions
The orientation of the structure is specified by a 'Projection Axis', defining the new c-axis of the resulting orthorhombic super-cell in terms of an real-space [uvw] vector of the input lattice. The default [uvw] is [001]. You may set an explicit [uvw] vector by clicking the [Set] button below. Spin controls attached to each of the edit controls allow you to change the value by ± 1.
The azimuthal orientation of the structure by rotation around the new projection axis is specified again in terms of a lattice vector [uvw] of the input structure. This 'Projection Orientation' vector defines the new b-axis of the resulting orthorhombic super-cell. Again you may set the components of this vector explicitly or modify it by clicking the attached spin controls. The default vector is [010].
The two vectors, 'Projection Axis' and 'Projection Orientation' fully define the orientation of the new orthorhombic super-cell basis vectors in the system of the input super-cell basis vectors. The definition of the new super-cell is completed by setting its dimension along the 3 new axes. This is done by specifying the a, b, and c lengths of the super-cell in nanometers. With the [Set] button you can enter an arbitrary size of the new super-cell, while the [Multiply] button allows you to grow or shrink the cell along the three axes by certain factors.
The volume defined by the two orientation vectors and by the size of the super-cell will be filled with atomic sites by periodic repetition of the input structure. For this procedure the origin of the new orthorhombic super-cell is identical to the origin of the input super-cell. Whenever one side (axis) of the new super-cell does not coincide with a lattice vector of the input cell, the resulting atomic structure will not be periodic. Since it may sometimes be difficult for beginners to identify commensurable cell sizes, two functions are provided, which try to determine the minimum size of the new super-cell representing again a periodic crystal structure. The function [Auto Orient & Size] determines the smalles possible periodic super-cell for the given 'Projection Axis', with free azimuthal orientation. Pressing the respective button will update the [uvw] components of the 'Projection Orientation' vector as wall as the a, b, and c lengths of the new super-cell. The function [Auto Size] will try to find a the super-cell size for a periodic structure with an azimuth orientation as close as possible to the current [uvw] setting. However, if such a solution is not found for reasonably small super-cell, the [uvw] components may be changed slightly.
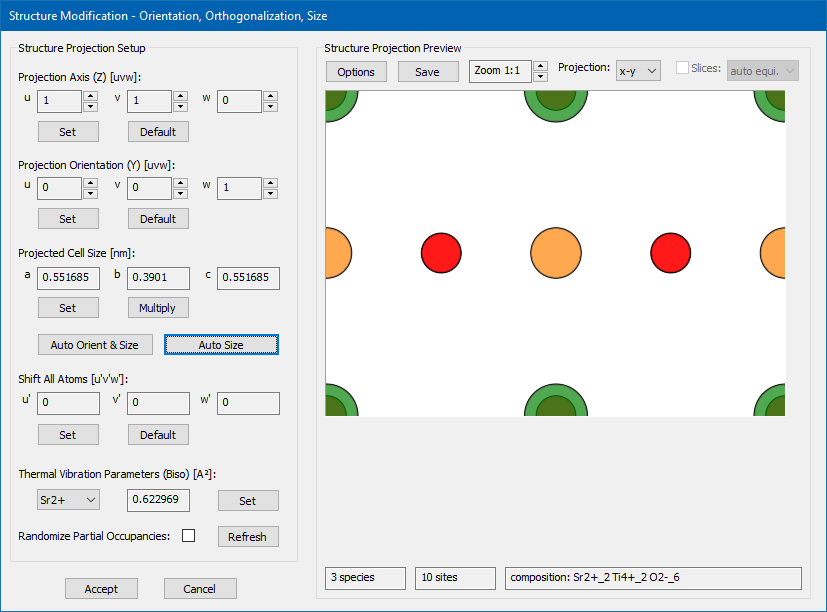
For the present example, we change the 'Projection Axis' to [uvw] = [110] and the 'Projection Orientation' to [uvw] = [001]. After doing so, you will see a strange atomic structure projection with the original cubic input cell size. By pressing the [Auto Size] button, the cell size is updated to an orthorhombic size with a = 0.551685 nm, b = 0.3901 nm, and c = 0.551685 nm. The x-y structure projection image displays now the typical perovskite [110] structure with a row of SrO columns and a row of Ti and O2 columns, as shown by the screenshot below.

Structure modification dialog after applying a new orientation of the cubic input structure to a [110] zone axis and updating the new super-cell size with the [Auto Size] function.
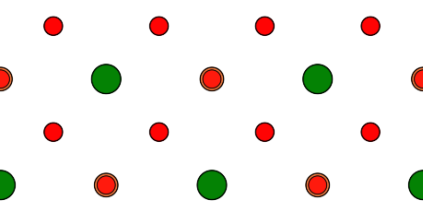
Selecting one of the structure projections x-z or y-z shows that the new structure has 4 atomic planes along the z direction, which would require a partitioning into 4 slices for the multislice calculation.
In order to avoid round-off errors in the slicing routine it is sometimes advantageous to shift all atoms along z by one half of a slice, such that the atomic sites of each atomic plane are centred in each equidistant partition of the super-cell along z. In the present case with 4 atomic planes and therefore preferably also 4 slices the amount of shift to be applied along z would 0.125. A shift of the atomic structure in fractions of the new super-cell lattice can be set by the components of a [u'v'w'] shift vector below the 'Auto Size' functions on the left side of the dialog. The shift-vector can only be set explicitly and denotes the amount of shift in fractions of the new super-cell size. Thus, if the cell size is changed, the same fractional shift corresponds to a different absolute shift vector. Take care to update a non-zero shift vector manually whenever you change the super-cell size. The default shift vector is [000].
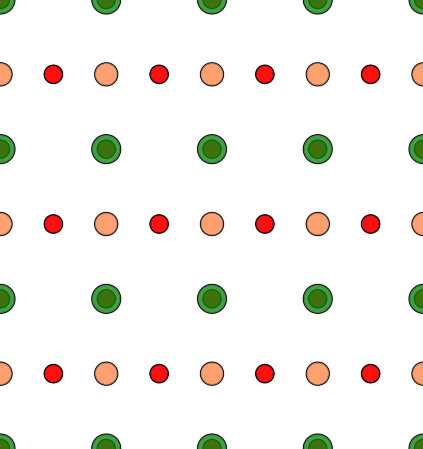
For the present example we also extend the new super-cell by a factor of 2 × 3 × 1 along its three axis using the [Multiply] button. Since the cell size along the new c axis is not modified by this extension, we do not need to update the shift vector [u'v'w'] = (0, 0, 0.125). The x-y and the x-z projection of the final super-cell is displayed in the image below.


SrTiO3 extended by 2 × 3 along x and y in x-y projection (top) and x-z projection (bottom). Due to the shift of the atomic structure by 1/8th along the c axis of the super-cell, the atomic planes are centered in each of the 4 equidistant partitions along z.
Below the controls for the shift vector setup, you find controls to manage the thermal vibration parameters of each atomic species in the structure model. The dropdown list control on the left contains all atomic species of the modified structure. The info box to the right of the dropdown control displays the Biso parameter of the selected atomic species in Å2 units. You may change the selected Biso parameter by clicking the [Set] button right of the info box.
By activating the 'Randomize Partial Occupancies' switch, the partial occupation of atomic sites contained in the modified structure will be changed to a full occupation variant. Already fully occupied sites will not be affected. Sites with a partial occupation against a partial vacancy will be changed randomly into a fully occupied site or a vacancy site. Sites occupied partially by multiple atomic species will be changed into a site fully occupied by a single species or a vacancy. The selection of occupation is done by taking a random choice for each site independently with probabilities proportional to the occupation levels defined by the input structure model. An new random occupation variant can be created by pressing the [Refresh] button to the right of the check box.
Last update: Jun 24, 2025 contact disclaimer(de)